


Lightweight Wonder
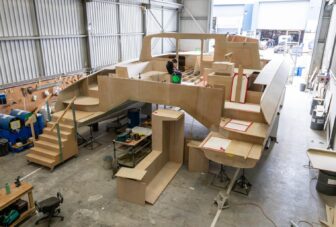
An expertly custom-crafted Schionning will sail the world with ease, thanks to the strong, durable DuFLEX Building System. A highly-customised Schionning Solitaire 1520 cruising catamaran is taking shape on the
The marine sector is no stranger to composite materials which are a key factor in achieving lightweight construction.
Architects and building professionals are continuously searching for alternatives to traditional materials used in construction.
Composite materials provide strength, lower vehicle weight and improved energy efficiency in transportation applications.
Composite materials have been supplied into numerous industries where design flexibility, performance and durability are critical.
DuFLEX Composite Panels were specifically developed to reduce construction time and optimise structural weight in the production of light weight composite structures. Time-consuming laminating, coring and vacuum bagging steps normally required to fabricate high performance composites are avoided and material waste, labour and tooling costs are greatly reduced.
ATL Composites was initially established in 1977, manufacturing epoxy systems to service the professional boat construction market in the Asia Pacific region. In 1980, ATL Composites expanded by opening a facility in Sydney and in 1989, re-located to the current location on Queensland’s Gold Coast.
DuFLEX® Composite Panels were developed in the early 1990’s, as a value-added product range that would reduce boat construction time and optimise structural weight.
ATL Composites performance over the past 40 years has established them as a leading supplier of advanced composite materials and engineering, for the construction of high performance, composite structures in Australia and internationally.
ATL Composites is ISO 9001:2015 certified and received their Certificate of Registration # 2600251777Q on April 4 2018. Important components of ISO 9001:2015 include customer satisfaction and establishing processes for continuous improvement to ensure customers consistently receive high quality products and services.
Highly-respected, international certification body, DNV has audited production facilities and manufacturing processes at ATL and has also audited production facilities and manufacturing processes at ATL and re-issued DNV-CP-0421 #AMPM000003M approval for the manufacture of fibre reinforced plastics which incorporates the production of composite panels including CNC machining, joining and bonding, and the finishing processed of core materials including cutting, sealing, kitting, machining, band sawing, sanding, scrimming, slitting, bonding, perforation and grooving.
Our professional team is dedicated to the continual development of advanced composite technology, and technical assistance is available over the telephone or by email, or we can provide on-site construction and process support, structural engineering expertise and CNC routing services, to enable our customers to produce durable, high quality products.
An expertly custom-crafted Schionning will sail the world with ease, thanks to the strong, durable DuFLEX Building System. A highly-customised Schionning Solitaire 1520 cruising catamaran is taking shape on the
The METSTRADE Show in Amsterdam, 15 to 17 November 2023, is the world’s largest B2B exhibition of marine equipment, systems and materials. This year, organisers confirm there will be 1,300
The METSTRADE Show in Amsterdam, 15 to 17 November 2023, unites the world’s leisure marine brands and businesses in the world’s largest B2B exhibition of marine equipment, systems
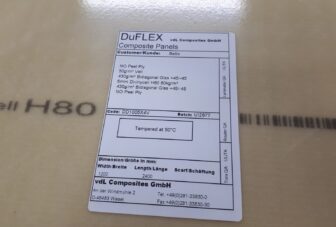
The DuFLEX® panel technology was developed in Australia by ATL Composites. The panels consist of a choice of lightweight, high-strength core materials, laminated with a high performance, specially formulated, epoxy resin and reinforced with multi-axial E- fiberglass or carbon fiber. The product has become the industry standard for composite boat construction for leisure and commercial marine craft in Australia. ATL Composites is now in partnership with European manufacturers.